First off: this is the 100th post I write in this blog. A great amount of shared info… ![]()
Now let’s say you want to point to a different connection string when you deploy your ASP.NET Web Project to your hosting provider. Until recently you’d have to modify your Web.config file manually. This is an easy procedure but you might end screwing up the file in some way.
Visual Studio 2010 comes with a great new feature called Web.config Transformation that allows you to perform transformations in whatever section of your Web.config file. This transformation process happens automatically when you build the deployment package for your application. Transformations occur as part of the MSBuild process. With this it’s easy to change the connection string (or better yet, anything you want) depending on the configuration currently selected when you build the deployment package. No more Web.config manual editing. Thanks God!
This post shows a simple replace transformation in which I replace one of my app settings named Connection.
This is the actual code of my Web.config file:
<appSettings>
<!-- Database connection pointer -->
<add key="Connection" value="MyProject.Web.Settings.local" />
</appSettings>
<connectionStrings>
<add name="MyProject.Web.Settings.local" connectionString="Server=localhost\sqlexpress;Database=MyDatabase;Integrated Security=True;" providerName="System.Data.SqlClient" />

<add name="MyProject.Web.Settings.hostingProvider" connectionString="Server=123.45.678.9;Database=MyDatabase;UID=user;PWD=pass123;MultipleActiveResultSets=true;Asynchronous Processing=True;" providerName="System.Data.SqlClient" />
</connectionStrings>
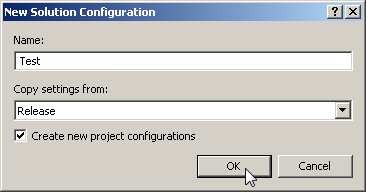
Step 1 - Create a new Configuration named Test:
 Figure 1 - Visual Studio Configuration Manager (menu Build => Configuration Manager)

 Figure 3 - New Solution Configuration named Test
Step 2 - Right-click your project’s Web.config file and select Add Config Transforms:
 Figure 4 - Adding Config Transforms for the Web.config file
Now you’ll see that VS creates one Web.config file for each configuration we have defined. Now we have 3 child .config files/transforms. In this case Web.Debug.config and Web.Release.config are related to the standard configurations that are automatically created with new web projects. Web.Test.config is related to the Test configuration we created in Step 1.
 Figure 5 - Web.config Transforms backing files
Step 3 - Double click Web.Test.config and add this code:
<?xml version="1.0"?>

<!-- For more information on using web.config transformation visit http://go.microsoft.com/fwlink/?LinkId=125889 -->

<configuration xmlns:xdt="http://schemas.microsoft.com/XML-Document-Transform">
    <appSettings>

        <!-- Database connection pointer -->
        <add key="Connection" value="MyProject.Web.Settings.hostingProvider" xdt:Transform="Replace" xdt:Locator="Match(key)" />

    </appSettings>

</configuration>
Above I’m transforming the Web.config file so that when I build my deployment package for the Test configuration I have the Connection appsetting replaced. My Connection appsetting will then point to the hostingProvider connection string. Take a special look in the transform I’m using (Replace) and the Locator to match the key Connection. For a more detailed explanation about the available transforms, read the post Web Deployment: Web.Config Transformation by Vishal Joshi.
Step 4 - Make sure you have selected the Test configuration in Visual Studio. Now Create the deployment package by right-clicking your ASP.NET Web Project and select Build Deployment Package:
 Figure 6 - ASP.NET Web Project’s Build Deployment Package context menu option
When you do this Visual Studio 2010 will generate a package with all the necessary files your app needs to run. My package is created in this path:
C:\MyProject\trunk\MyProject\MyProject.Web\obj\Test\Package
Inside this folder you’ll find a .zip file named MyProject.Web.zip (the package) that you can use to install the app in IIS or you can handle it to the one responsible for actually installing the app on the server.
Note: Visual Studio 2010 comes with other great feature that allows you to Publish this package directly to your hosting provider using Web Deploy, FTP, etc. I’ll cover this in another post…
You’ll also find a folder named PackageTmp. This folder has everything that goes into that .zip package. Open the Web.config file that lies within this folder and see if the transformation was applied correctly. It should’ve been applied.
In my case in my main Web.config file I’m pointing to a local connection string:
<add key="Connection" value="MyProject.Web.Settings.local" />
This makes sense since I’m working in my home machine. The transformation I'm applying should transform/replace the Connection appsetting when I build the deployment package for the Test configuration. Now the appsetting must point to the hosting provider connection string like this:
<add key="Connection" value="MyProject.Web.Settings.hostingProvider" />
Hope this simple sample helps shed some light in this really powerful and interesting feature that comes with Visual Studio 2010.
Note: if you wanna get direct access to the original and transformed Web.config files, check these folders:
C:\MyProject\trunk\MyProject\MyProject.Web\obj\Test\TransformWebConfig\original
C:\MyProject\trunk\MyProject\MyProject.Web\obj\Test\TransformWebConfig\transformed
Test transforms online
http://webconfigtransformationtester.apphb.com/


